


LEARN
pliability

Lower back pain has a way of shrinking your life. You hesitate before picking things up, you brace before you sneeze, and every workout starts with a negotiation. The good news: for most people, the right response is movement, not rest. Targeted exercises for lower back pain release the tight hips, hamstrings, and glutes that drag on your spine, then build the core strength that keeps it supported. Pair them with regular flexibility exercises and you give your back fewer reasons to complain in the first place.
One thing before we start: this article is education, not a diagnosis. It explains why lower backs act up and walks through 30+ stretches, strength moves, and mobility drills you can do at home, but it cannot examine you. If anything on the red-flag list below sounds familiar, see a clinician before you see a mat.
when back pain needs a clinician, not an exercise plan
Most lower back pain is mechanical: muscles, joints, and connective tissue objecting to how they have been loaded, or how long they have been left still. That kind usually responds well to the exercises below. Some back pain is different, and stretching through it wastes time you should spend getting assessed. See a medical professional first if you notice any of these:
Pain that radiates down one or both legs, especially below the knee
Numbness or tingling in your legs, feet, or groin
Changes in bladder or bowel control
Pain that wakes you at night or does not ease when you change position
Pain that started with trauma, such as a fall or a car accident
Severe or steadily worsening pain is not a self-management project. A doctor or physical therapist can rule out the serious causes and tailor exercises to your body, which is something no article can do.
exercises for acute back pain: start gentle
If your back seized up recently and none of the red flags apply, the general pattern clinicians recommend is to keep moving within your comfort zone rather than resting in bed. Avoiding movement tends to make the body more protective and more pain-sensitive over time. Start with the gentlest stretches below, such as knee rolls, knee hugs, and cat and cow, keep the range small, and let your symptoms set the pace. How quickly you progress from there is exactly the kind of timeline a clinician should confirm for your specific case.
why lower backs hurt in the first place
Lower back pain is one of the most common physical complaints there is. National survey data suggests roughly one in four U.S. adults has had it in the past three months, and most estimates put the lifetime odds around four in five. If you have had an episode before, another one is likely. The usual suspects:
Muscle or ligament strains and sprains
Overuse from repeating the same movement or the same workout
Degenerative changes in discs, joints, and ligaments, including arthritis
Prolonged sitting and a mostly sedentary week
A core that is not pulling its weight, which shifts load onto the spine
Lifting with your back instead of your legs
The back is a dense stack of bones, discs, nerves, muscles, and tendons, so pinning pain on a single culprit is hard even for professionals. What is widely agreed on: flexibility work for the hips and legs, plus core and back strengthening, helps most mechanical low back pain and lowers the odds of the next episode.
how to stretch your lower back safely
Before the list, calibrate what this work should feel like. Mild pulling, muscle effort, and some next-day tenderness are normal. Sharp, stabbing, or electric pain is not. Stop immediately if you feel it, and if a movement consistently makes your pain worse, skip it or ask a physical therapist how to modify it.
engage your core, gently
Most of these exercises ask you to engage your abs. That means drawing your belly button in toward your spine so your lower stomach flattens slightly. If your abs are bulging outward, you are over-flexing. You should feel tension between your hips and still be able to breathe normally.
keep breathing
Holding your breath is the most common form fault in back work. Exhale on the effort, inhale on the release, and never brace so hard that the breath stops.
expect soreness, not more pain
Muscles tiring during the work and feeling tender the next day is a sign they were challenged, and after this list you may feel it in your legs as much as your back; these stretches for sore legs help there. Give yourself recovery time between sessions: back-focused strength work two or three times per week, with gentle stretching daily, is a sustainable flexibility routine. If the exercises are making your pain worse, contact your doctor.
get up carefully
Many of these are floor exercises. If you tend to get lightheaded or dizzy when you stand up after lying down or bending, rise slowly and lean on the standing and seated options in the last group instead.
Consistency beats intensity here. Fold the moves you pick into a broader flexibility workout, and if you would rather follow a video than a written list, roundups of the best flexibility apps and head-to-head comparisons like StretchIt vs pliability and Bend vs StretchIt show what guided options look like.
the best lower back stretches to ease back and hip pain
Poor flexibility in the hips, legs, and glutes is one of the most common drivers of low back pain: when those areas stiffen, the lower back moves more than it is built to. This first group starts there, with leg flexibility exercises and classic spine stretches that ease tension directly. Move into mild tension, breathe, and let time do the work; for more options beyond the back, browse the best stretches for flexibility.
1. hip flexor stretch
How to do it:
Place one knee on the ground in a kneeling position.
Bring the arm of that same side up straight and slightly back.
This will cause your hips and middle back to extend.
Hold for 30 seconds and release.
Perform 3 times on each side.
2. hip adductor stretch
How to do it:
While standing, place the inside of your ankle on a table, bed, or tall chair.
Bring the opposite arm straight up next to your ear as if you are reaching for the ceiling.
Lean into the stretching leg, hold for 20 to 30 seconds, and release.
Repeat on each side 3 times.
3. hamstring stretch
How to do it:
Stand facing a table, bed, or tall chair.
Place the back of your heel on the surface so that your leg is straight.
Lean forward at the hips to stretch your hamstring.
Hold for 30 seconds and release.
Repeat on each side 3 times.
4. glute stretch
How to do it:
Stand facing a table, bed, or tall chair.
Place the outside of your heel and knee on the surface so that your leg is at a 90-degree angle.
Lean forward at the hips while keeping your back straight.
Hold for 30 seconds and release.
Repeat on each side 3 times.
5. figure 4
How to do it:
Lying on your back with your knees up, place one ankle on the other knee, forming a figure 4 with your legs.
Press down on the leg you crossed. You should feel the stretch in your hip.
Hold for 20 to 30 seconds before releasing.
Perform 3 times on each side.
6. knee to chest
How to do it:
Lying on your back with your knees up, grab the back of one knee with both hands and bring it to your chest, or as far toward your chest as you can.
Hold the stretch for 20 to 30 seconds before releasing.
Switch sides and perform 3 times on each side.
7. knee hugs
The two-legged version of the knee-to-chest stretch.
How to do it:
Lie on your back with your legs out straight.
Bring both knees to your chest.
Grip your knees with both hands, pull them slowly into your chest like a hug, and breathe out.
Hold for five seconds.
Release your hands, breathe in, and bring your legs back down straight.
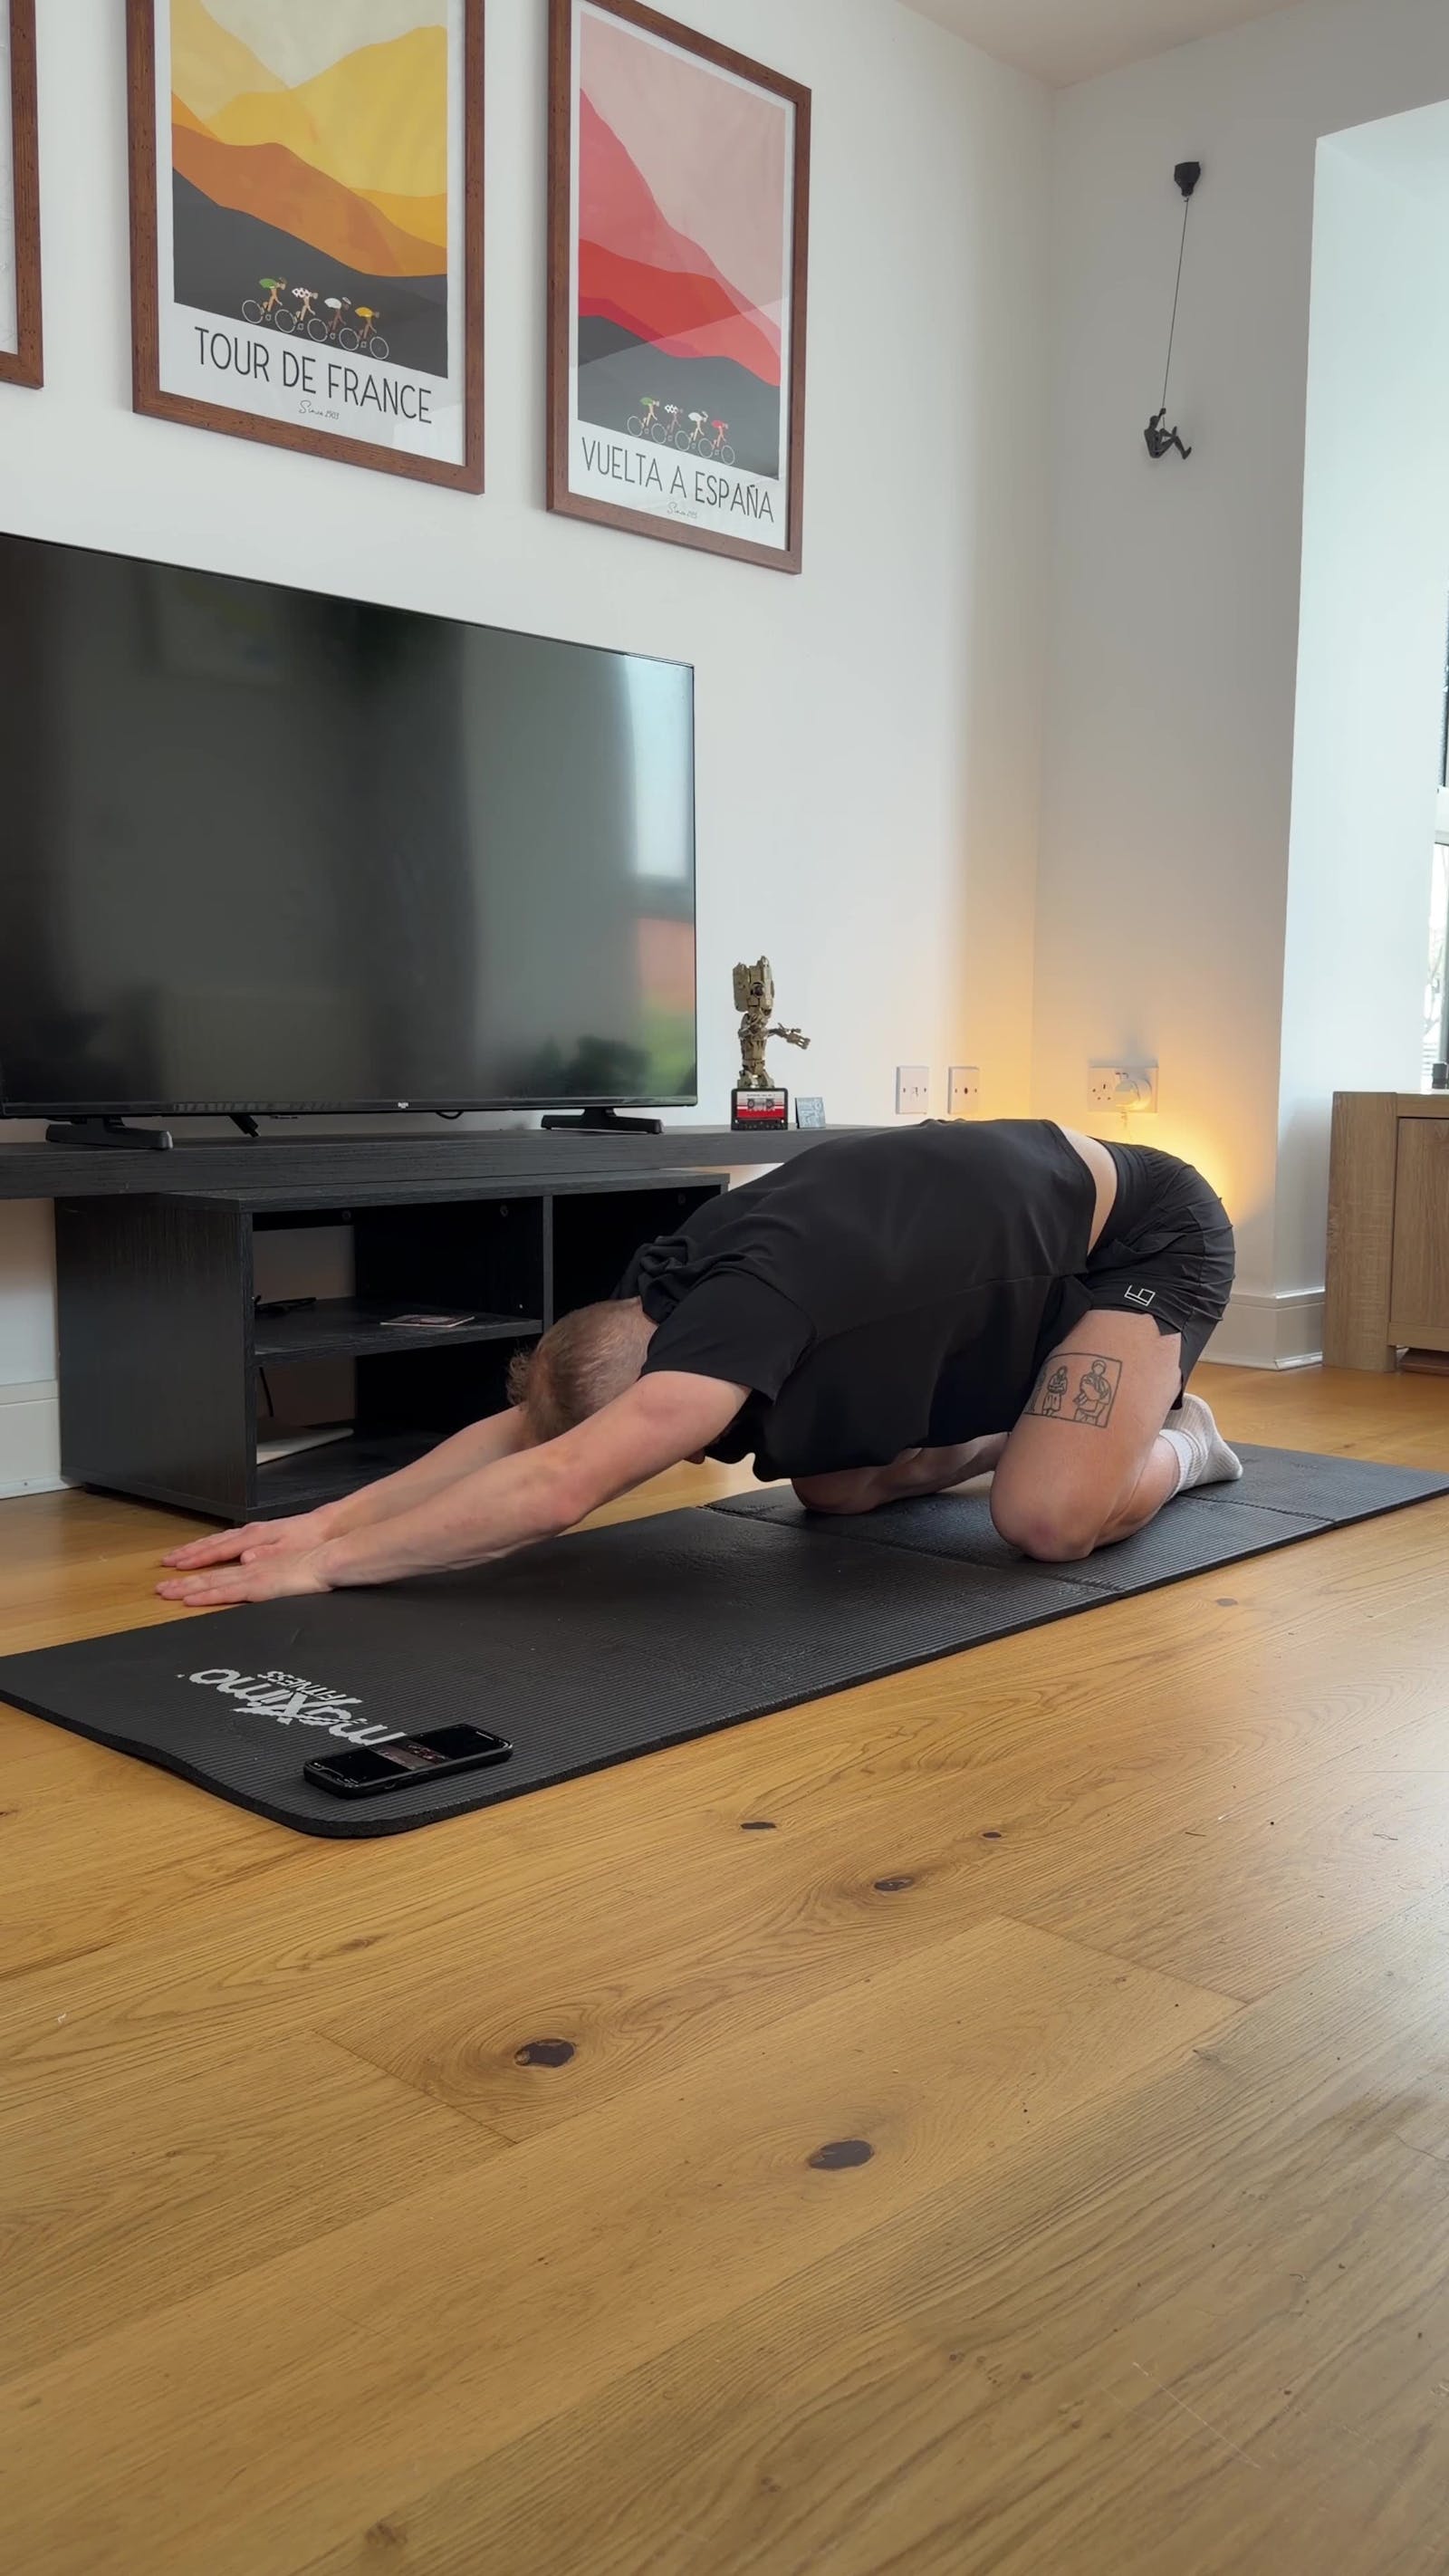
8. child's pose
Why it helps: This one stretches the back extensors, the muscles attached to the back of the spine that help you stand and lift. They tend to tense up when your lower back hurts.
How to do it:
Sit on your knees, fold forward, and walk your hands out in front of you so that your forehead comes toward the floor.
You can extend your arms or return them to rest near your feet.
Hold for 20 to 45 seconds.
9. cat and cow
How to do it:
Begin on all fours with your hips over your knees, shoulders over your hands, and head neutral.
Breathe in while bringing your eyes up toward the ceiling and bending your spine toward the floor.
Breathe out while bending your spine toward the ceiling and tucking your chin to your chest.
Repeat 15 to 20 times.
10. side-to-side
How to do it:
Begin lying on your back with your feet pulled toward your hips and your knees up.
Twist your knees gently to one side and stop when your hips start coming off the mat. Keep your upper body in position.
Bring your knees back the other way and do the same thing on the other side.
Repeat 25 to 30 times.
11. knee rolls
The slower cousin of the side-to-side: the same rotation, held briefly at each side.
How to do it:
Lie on your back with your knees bent and your feet flat on the floor.
Put your arms out to the sides at a 90-degree angle to your body.
Breathe out and slowly roll both knees to the right, keeping your legs and feet together.
Hold for one to two seconds.
Breathe in and lift your knees slowly back to center.
Repeat on the left side.
12. upward facing dog
How to do it:
Lie face-down on your stomach with your legs straight out.
Place your hands on the floor alongside your chest and lower ribs.
Take a deep breath and engage your core by pulling your belly button up and in toward your back.
Breathe slowly for three to five seconds as you press your hands into the floor and straighten your arms, lifting your head, neck, and back upward.
Try to keep your hips on the ground.
Breathe in and lower yourself back down by bending your arms.
13. standing back stretch
Skip this one if you have concerns about your balance.
How to do it:
Stand up straight with your legs shoulder-width apart.
Slowly lean forward, rounding your back up toward the ceiling while dropping your shoulders down, and reach your fingers toward the floor.
Relax your back muscles so it feels like you are dangling your upper body down.
Slowly lift yourself back up to stand straight.
Repeat five times.
core and back strengthening exercises for lower back pain
Stretching brings relief; strength makes it last. A strong trunk supports the spine so everyday bending, lifting, and sitting stop aggravating it. This group runs roughly from easiest to hardest, and three of the moves, the curl up, side plank, and bird dog, are often called the McGill Big 3 because they build core stability while keeping the load on the spine low. Remember the drawing-in cue from earlier, and pair this work with muscular flexibility exercises so you gain support without losing range. That balance of usable range and control is the difference between pliability and flexibility.
14. supine core strengthening
How to do it:
Lying on your back on a mat or the floor, bring your knees up and your feet comfortably away from your hips.
In this position, engage your ab muscles and press your low back into the mat or floor.
Repeat 15 to 20 times.
15. supine core strengthening with leg draw
How to do it:
Lying on your back with your knees drawn up and feet flat, engage your ab muscles.
Maintaining the engagement, lift one knee toward your chest without using your hands.
Keep your abs engaged until you put your foot back in the starting position.
Repeat 15 to 20 times on each leg.
16. curl up
Why it helps: The curl up improves core stability while keeping the load on your spine low, which is exactly what you want while your back is irritable.
How to do it:
Lie on your back with one knee bent and that foot flat on the floor.
Extend your other leg out straight.
Place both hands underneath the small of your back and, contracting your abdominals, curl up to lift your shoulders off the floor.
Hold for 10 seconds, then switch sides and repeat.
Do 3 to 5 reps on each side.
17. bird dog
How to do it:
Begin on your hands and knees, shoulders over hands and hips over knees.
Simultaneously stretch one arm and the opposite leg straight out. (Left arm, right leg, or vice-versa.)
Hold for 10 to 15 seconds before bringing your limbs slowly back down.
Repeat 15 to 20 times, alternating each time.
18. side plank
Why it helps: The side plank targets the core and hips and is easy to scale up or down based on your ability and comfort level.
How to do it:
Lie on your side, knees bent and stacked.
Bend your elbow to support yourself on your forearm, fingers pointing away from your body.
Engage your core to press your hips up.
Hold for 10 seconds, then switch sides and repeat.
Do 3 to 5 reps on each side.
Tip: You can straighten your supporting arm and keep your palm on the ground if you prefer. Whichever variation you pick, choose the one you can do with the best form.
19. side bridge
The straight-body progression of the side plank above.
How to do it:
Start by lying on your side with one elbow underneath you.
Rise onto your elbow and forearm.
Bring your legs off the ground so you are resting only on your forearm and the side of one foot.
Hold for 15 seconds before easing yourself back down. Increase the hold time as you feel comfortable.
Repeat 10 to 15 times on each side.
20. prone bridge (plank)
How to do it:
Begin by lying on your stomach, your elbows underneath you and your toes ready to take your weight.
Lift yourself to rest on your toes and elbows.
Your core should be engaged, and your body should be straight.
Keep your hips and chest in line and parallel to the floor.
Hold for 15 seconds before easing yourself back down.
Increase the hold as you feel comfortable, working up to 90 seconds as you progress.
21. press ups
How to do it:
Lying flat on your stomach, bring your elbows to your sides and place your hands just above your shoulders. Your legs should be fully extended, hips flush with the mat or floor.
Pull your shoulder blades back and in while you lift your chest off the ground.
Hold for 5 seconds, keeping your legs and hips in contact with the floor. Your neck should stay long and in line with your upper spine the entire time.
Slowly return your chest to the ground.
Repeat 15 to 20 times.
22. prone cobras
How to do it:
Lying flat on your stomach with your legs extended, place your arms flush at your sides, hands pressed to your legs.
Without using your hands to help, lift your chest off the ground, keeping your neck long and in line.
Pull your shoulder blades in and flex your glutes throughout.
Hold for 3 to 5 seconds before slowly lowering your upper body back down.
Repeat 10 to 15 times.
23. Superman
How to do it:
Lie face down with straight legs and your arms stretched out in front of you.
Breathe out and slowly lift your arms, shoulders, and legs off the floor, squeezing your glutes tightly.
Breathe in and slowly lower back down to the floor.
If straight arms feel too difficult, put your fingers on your temples and stick your elbows out.
24. bridge
How to do it:
Begin lying on a mat or the floor with your knees up and your feet flat, a comfortable space away from your hips.
Keeping your arms on the floor, lift your hips off the ground to make a bridge. From your chest to your knees should be a straight line.
Hold for 5 to 10 seconds, keeping your shoulder blades and neck on the ground, glutes and abs engaged the whole time.
Slowly lower your hips to the ground.
Repeat 15 to 20 times.
Tip: To make this exercise more difficult, cross your arms over your chest so you cannot use them to help you.
25. pelvic lift (hip thrust)
Nearly identical to the bridge, but slower and breath-led, which makes it a good fit for more irritable days.
How to do it:
Lie on your back with your knees bent up and your arms by your sides.
Take a deep breath in.
As you breathe out, engage your core and squeeze your glutes.
Lift your hips off the floor. Your body should form a straight line from your shoulders to your knees.
Hold for one to two seconds.
Breathe in and gently lower to the ground.
26. mini squat
Why it helps: Squats train the hip hinge, a movement you use every day, and along with strong quads, hamstrings, and glutes they give your spine a stable base. Rebuilding confidence in the movement also chips away at the fear of bending that often follows back pain. A mini squat is a partial squat, so you never have to go all the way down.
How to do it:
Stand with your feet shoulder-width apart.
Push your hips back and keep your back straight; bend your knees to start lowering yourself toward a sitting position.
Stop when your butt is about halfway to your knees to complete a half squat.
Stand back up.
Do 8 to 12 reps. Placing a chair behind you can help guide the movement.
27. good mornings
How to do it:
Stand up straight with your feet shoulder-width apart.
Place your fingers against your temples and stick your elbows out.
Engage your core.
Slightly bend your knees while you hinge at the hips and lower your upper body forward, keeping your back straight at all times.
Lower as far as you can comfortably keep your back straight, aiming for your body to run parallel with the floor.
Slowly lift back up to standing while keeping your back straight.
Breathe in while lowering and breathe out on the way back up.
mobility exercises for lower back pain you can do standing or seated
No floor, no mat, no changing clothes. These are for long sitting days, stiff mornings, and easy movement between the harder sessions.
28. standing trunk rotation
How to do it:
Stand up straight with your legs slightly apart and slightly bent at the knee.
Cross your arms over your chest.
Keep your hips facing forward at all times.
Slowly rotate to the right as far as is comfortable, then return to facing the front.
Slowly rotate to the left as far as is comfortable, then return to facing the front.
Repeat the movement 10 times on each side.
29. standing trunk rotation with extended arms
How to do it:
Stand up straight with your legs slightly apart and engage your core.
Stretch your arms out in front of you at a comfortable height, clasping your hands together.
Keep your hips facing forward at all times.
Slowly rotate to the right as far as is comfortable, then return to facing the front. Repeat to the left.
Breathe out while twisting and in when returning to center.
Only twist as far as is comfortable; you should feel a slight pull on the muscles.
As this gets easier, add a small weight in your hands, such as a water bottle. Light resistance work like band stretches progresses the same way.
30. standing side bends
How to do it:
Stand up straight with your legs shoulder-width apart and your arms by your sides.
Keeping your body straight, slowly lower your torso to the right, sliding your hand down your leg toward your knee.
Reach as far as is comfortable for you.
Slowly rise back up to standing straight and repeat on your left side.
Repeat the movement 10 times on each side. If bending this way feels good, there are more side stretches worth adding.
31. high knees
How to do it:
Stand up straight with your legs slightly apart.
Slowly raise your right knee to 90 degrees, or as high as you comfortably can, then slowly lower it back to the floor.
Repeat with your left knee.
Repeat the movement 10 times with each leg.
Tip: If you struggle with balance, hold onto the back of a chair or a countertop, and have someone nearby if you need extra help.
32. seated marching
How to do it:
Start seated, sitting tall with your back straight.
Take a deep breath in.
As you exhale, simultaneously lift your right knee and left arm toward the ceiling.
As you inhale, lower them, then repeat with the opposite leg and arm.
Keep your lifted leg bent, as if marching in place.
Do three sets of eight reps on each side.
ease your lower back with pliability | get 7 days free on any platform
A list gets you started. What actually changes a back is showing up for the work a few times a week, and that is what pliability is built for. The Rebuild hub holds corrective, therapy-informed sessions designed to restore stability and control after pain, strain, or a long stretch of inactivity, which makes it the natural home for everything you just read. Daily Sessions give you a short, calming reset to return to every day, Paths like Deskbound Reset counteract the hours of sitting that feed most back pain, and Build Your Program lets you plan your week around your lower back specifically. No punishing workouts, no perfect poses. Just steady, guided work your spine will notice. Try pliability free for 7 days on iPhone, iPad, Android, or the web.
Related Reading



Move better in 10 minutes a day.
10,000+ five-star reviews.